The first step in this tip is a quick refresher on updating your toolbar. For more information about customizing your homepage, you can watch this tip or download this document:
Part 1: Basic SmartList Overview – How to Open SmartList
- Click on the SmartList icon in your toolbar.
- If you do not have a customized toolbar that includes SmartList, you can open SmartList by clicking: Microsoft Dynamics GP>>SmartList
SmartList has the following toolbar:

- New: Only available in GP2013 SP2 and above. This opens the SmartList Designer tool.
- Search: Used to set Maximum Number of Records and filters.
- Refresh: If while looking at a SmartList, new records are added that match your search, you can refresh your query. Note: All queries are up to date at the moment you open SmartList. “Refresh” only needs to be used if you have the SmartList open when the new records are added.
- Columns: Click “columns” to add additional fields/columns to the list. You can also change column order and the Display name of the columns chosen.
- Favorites: There is not a “SAVE” button inside of SmartList. Saving a SmartList is done by adding a new Favorite or modifying an existing Favorite. Tip: It is much easier to start with an existing SmartList and then just add the columns you need vs. starting from scratch.
- Print: This is a quick way to print out the list you created. However, if your list has more than about 5 columns, the print out looks pretty terrible. In that case, export to Excel or Word and format there before printing.
- Excel / Word: Allows you to export the list to Excel or Word. Just click the button!
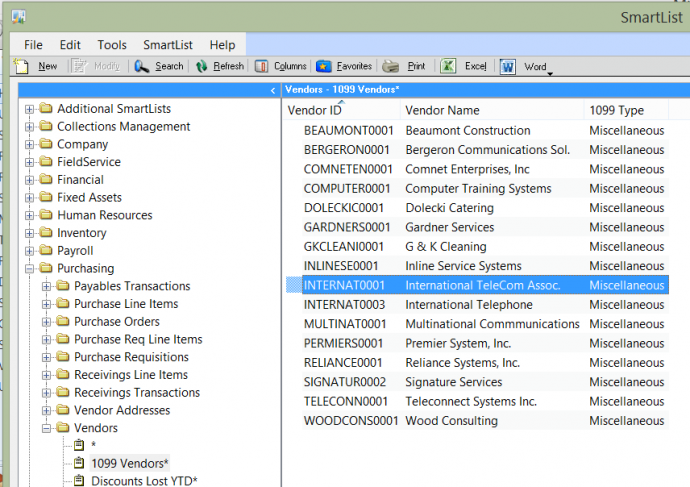
Part 2: Using a Pre-Defined SmartList to Create a Custom SmartList
- Open SmartList
- Click the + next to Purchasing
- Click the + next to Vendors
- Select “1099 Vendors*” (Note: The SmartLists that were pre-defined by Microsoft all end with an asterisk)
Part 3: Customizing by Adding Additional Columns
- Click on “Columns”
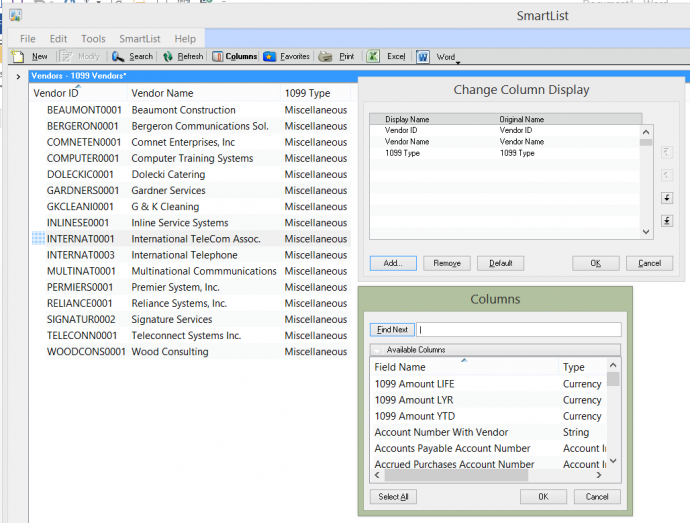
- Click Add Note: The Columns are listed in Alphabetical Order by “Field Name”. This can be difficult to use if you do not know the name of the field. I suggest clicking on the heading marked “Type” if you are for example looking for a date (i.e. Last Check Date). You can then scroll to the items in the Date section and you will easily find the field you are looking for.
- For this example, add:
- Last Check Date (Type = Date)
- Amount Paid YTD (Type = Currency). Note: This is based on the amount paid since you last closed Payables
- Tax ID Number
- Tax Registration Number
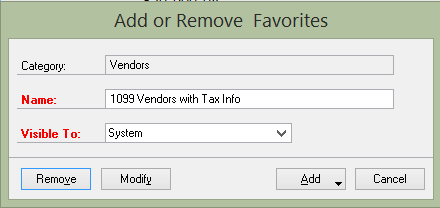
- Save as a New SmartList
- Click Favorites
- Type over the name with a new name (Example: 1099 Vendors with Tax Info)
- Click Add>>Add Favorite (Do not click “Add Favorite and Reminder)
Part 3: Adding Additional Filters to the List
- Using the SmartList above, click on “Search”
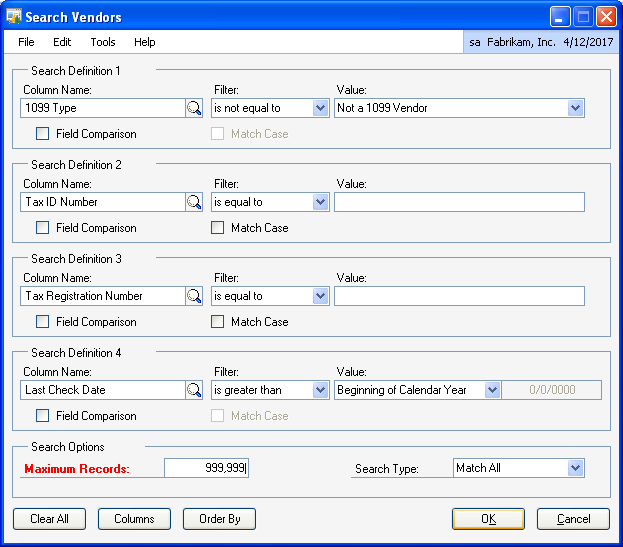
- Add the filters above to get a list of Vendors you have paid this year that are 1099 vendors that you have paid during the current year that are missing Tax Information
- 1099 Type >> is not equal to >> Not a 1099 Vendor (this will pull all types of 1099 vendors)
- Tax ID Number >> is equal to >> (leave blank)
- Tax Registration >> is equal to >> (leave blank)
- Last Check Date >> is greater than >> (You can leave the value as Enter Date and put in a specific date, or you can drop down as shown above and select Value = “Beginning of Calendar Year”)
- Increase the “Maximum Records” to more than 1000 (just in case).
- Click OK
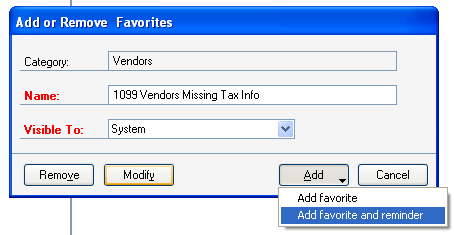
- Once the SmartList Runs, save as a new SmartList to create a Reminder.
Part 4: Saving a New SmartList as a Favorite and Reminder
- Using the newly filtered list above, click Favorites.
- Type over name (example: 1099 Vendors Missing Tax Info)
- Click Add>>Add favorite and reminder
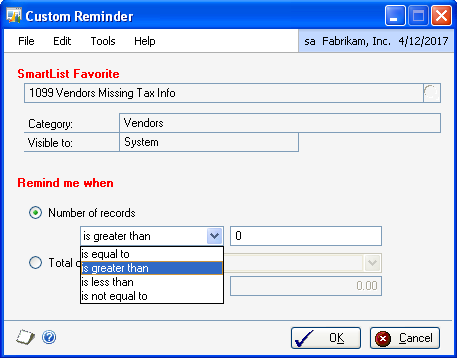
- In the “Custom Reminder” screen: Remind me when = Number of Records >> is greater than >> 0
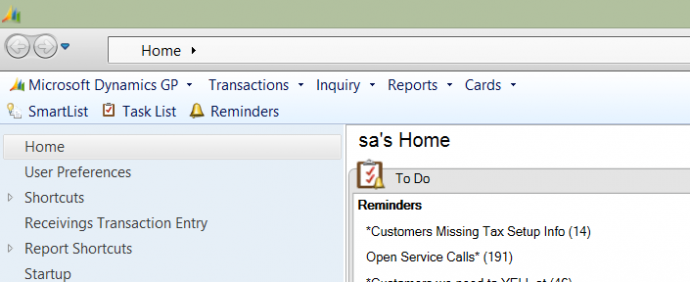
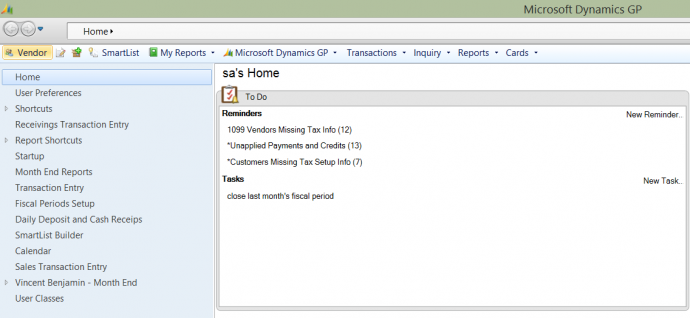
Once the reminder is set, it will automatically update the “Reminders” section on your homepage. You can click on the link to open the SmartList.
By, Amber Bell, CAL Business Solutions


