Based on customer and partner feedback, in Acumatica 2020 R1 you can now add side panels to data entry screens. Side panels are a navigational aid that allow you to reference generic inquiries, reports, or other screens directly from the current screen you are working on. This enhancement means less clicks in the system on a day-to-day basis, any you can access much more information by viewing one simple screen.
Challenge:
- During data entry and retrieval, you need quick access to information that relates to on-screen records. For example, while entering a sales order, you may want to see past sales orders and open receivables.
Solution:
- Define side panels for data entry screens using the customization manager.
- Reference generic inquires, reports or other screens.
- Pass parameters based on data in the record header.
Video Transcription:
In my instance of Acumatica, I have a customer view dashboard. In today’s example, I will add this customer view dashboard as a side panel from a data entry screen. I will use the opportunities screen, which allows me to enter data about new sales opportunities.
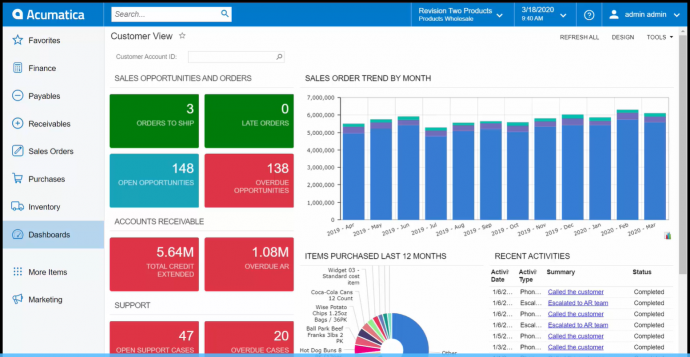
Currently, I have no side panel on this page, so if I wanted to access my customer view dashboard, I would need to navigate to that separately. Let’s add the side panel to allow us to view the customer dashboard directly from this screen.
To do this, I will navigate to my customization projects and create a new project. We will call this, opportunity customer dash. I’ll select the customization project, and we will add an existing screen. We want our opportunities screen, which I will select from the list.
Within my customization project editor, I will select the drop-down of the screen we are working on, which is my opportunities, and I will select the actions. On the action screen, we will create a brand new action. The action-type is going to be a side panel, and we will enter the appropriate data, customer dash on op.
We can also select an icon to use within the side panel navigation path, as well as the destination screen, which in our example today is the customer view dashboard that we would like to populate in the side panel on our opportunities screen.
Finally, we’ll add the navigation parameter, which in our example today is going to be the business account that we are using on the opportunity record. I will select okay, and at this point we can publish the current project that we are working on. When the website is updated, we can go check our work.
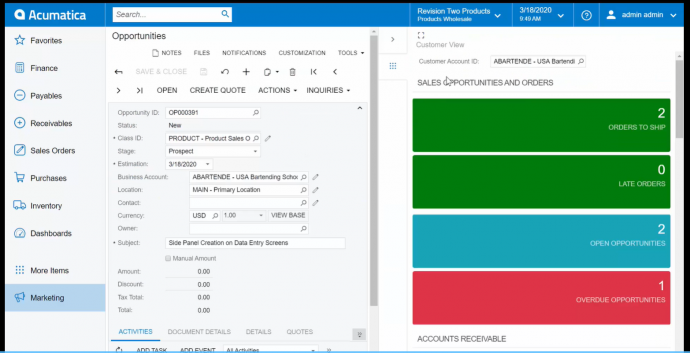
This time, when we navigate to our opportunities record, we will be able to open the side panel to see the customer view dashboard of whichever customer we have entered into the opportunity record. For example, here we are looking at an opportunity that we are creating for a bartending school, and we can see the customer view over on the right-hand side by using the side panel.
This enhancement will allow Acumatica users to make less clicks in the system as they are navigating on a day-to-day basis, as well as allow them to access much more information by viewing one simple screen.
Thank you for joining me today for this overview of how to add side panels to data entry screens. For more information, please contact your local Acumatica reseller or reach out to us at www.acumatica.com.”
For more tips visit https://www.calszone.com/tips
Learn more about Acumatica Cloud ERP
If you are evaluating a new ERP system, or are already using Acumatica, contact CAL Business Solutions. 860-485-0910 x4 or sales@calszone.com
By CAL Business Solutions, Acumatica and Microsoft Dynamics GP Partner, www.calszone.com
Follow us on Twitter: @CALERPNEWS


